Hey everyone, it is Louise, welcome to my recipe site. Today, we’re going to make a special dish, pickled chrysanthemum turnips. It is one of my favorites food recipes. This time, I’m gonna make it a bit tasty. This is gonna smell and look delicious.
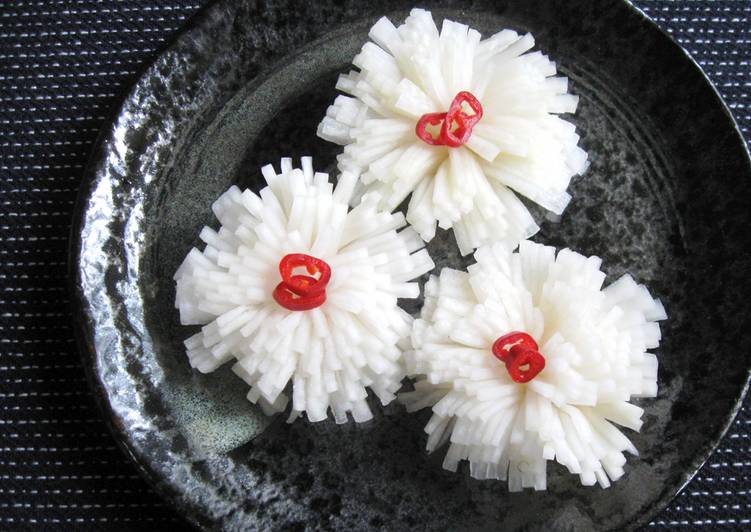
What is Pickled Chrysanthemum Turnip (Kikka Kabu)? These turnips are pickled in rice vinegar, sugar, and kombu. The pickles themselves are just an everyday pickle, but the white flesh of the turnip is meticulously cut to represent the petals of a chrysanthemum flower. Great recipe for Pickled Chrysanthemum Turnips. 'Pickled Chrysanthemum Turnips' is called 'Kikka Kabu' (菊花かぶ) in Japan.
Pickled Chrysanthemum Turnips is one of the most popular of recent trending meals in the world. It is easy, it is fast, it tastes delicious. It’s enjoyed by millions every day. Pickled Chrysanthemum Turnips is something that I’ve loved my entire life. They’re fine and they look fantastic.
To get started with this recipe, we must prepare a few ingredients. You can have pickled chrysanthemum turnips using 12 ingredients and 8 steps. Here is how you can achieve it.
The ingredients needed to make Pickled Chrysanthemum Turnips:
- Prepare Small Turnips OR 1 large Turnip
- Get *Note: Today I used 1 large Turnip. I couldn’t find small ones
- Prepare *Note: Red Radishes can be used
- Take Water
- Take Salt
- Prepare Marinade
- Take Rice Vinegar
- Take Sugar
- Take Salt
- Get Water
- Take Kombu (Kelp) *cut into thin strips
- Take slices Chilli *optional
Wash Turnips, cut off the top and bottom. Wash Turnips, cut off the top and bottom. Peel off the skin. *Note: Don't peel the skin of Red Radishes. Origin of Pickled Chrysanthemum Radish Today's dish is a variation of the Japanese dish called Kikka Kabu (菊花かぶ), which uses turnips (see the photo below).
Instructions to make Pickled Chrysanthemum Turnips:
- Wash Turnips, cut off the top and bottom. Peel off the skin. (*Note: Don’t peel the skin of Red Radishes.) If you use a large Turnip, cut off the top and bottom, then cut into 3cm cubes.
- Place a piece of Turnip (OR Radish) on a chopping board, stem side down, and slice 1-2mm thin from one end to the other. To avoid accidentally cutting all the way though, I strongly recommend to place 2 chopsticks on the board.
- Turn it 90 degrees, hold the slices together firmly, then slice in the same way. Repeat with remaining Turnip pieces (OR Radishes).
- In a bowl, mix Water and Salt. Soak them in this salty water for 1 hour. *Note: Scraps can be pickled together, or use them for soup or other dishes.
- Make the marinade. Combine all the ingredients.
- Gently squeeze the softened Turnip pieces (OR Radishes) to remove salt water, and place in a small container that they can just fit in. Pour the marinade over, cover with a lid, and set aside in a cool place or in the fridge overnight OR 1-2 days.
- *Note: It’s a good idea to marinate them in a ziplock bag. Keep everything in the bag and remove the air, so that the Turnip pieces (OR Radishes) can stay in this amount of marinade.
- To serve, squeeze the marinade, spread the tips to make it look like Chrysanthemum Flower. Add some Chilli OR Yuzu Rind (OR Lemon Rind) slice in the centre.
Peel off the skin. *Note: Don't peel the skin of Red Radishes. Origin of Pickled Chrysanthemum Radish Today's dish is a variation of the Japanese dish called Kikka Kabu (菊花かぶ), which uses turnips (see the photo below). The Japanese name translates to chrysanthemum flower (kikka, 菊花) turnip (kabu, かぶ) as the turnip looks just like a white chrysanthemum flower. These pickled chrysanthemum turnips, while delicate, are surprisingly easy to make, with only basic cutting techniques needed! from www.otakufood.com. Once the sugar has dissolved, remove from heat and let cool. - Prepare your radishes by cutting off the bottom to make a flat base.
So that’s going to wrap this up with this special food pickled chrysanthemum turnips recipe. Thank you very much for reading. I’m sure that you will make this at home. There is gonna be interesting food in home recipes coming up. Remember to bookmark this page on your browser, and share it to your loved ones, colleague and friends. Thanks again for reading. Go on get cooking!